
Introduction
In our journey towards a more sustainable future, electric vehicles (EVs) stand out as a symbol of environmentally conscious transportation. But to fully harness their potential, it’s vital that we power them in the most eco-friendly manner. This is precisely where the integration of Solar-Powered EV Charging with OpenEVSE and Home Assistant becomes significant. It offers a unique opportunity for EV owners to optimally charge their vehicles using surplus energy from solar power. This approach not only boosts the green credentials of EVs but also enhances energy efficiency and cost-effectiveness in home automation systems. By tapping into the power of solar energy, we can make a considerable leap forward in our eco-friendly endeavors, making the most of both electric vehicles and renewable energy sources.
The OpenEVSE Charger: A Quick Overview
OpenEVSE provides an advanced EV charging solution that is not only efficient but also customisable. It stands out for its open-source nature, allowing tech enthusiasts and eco-conscious individuals to personalise and enhance their EV charging experience.
Home Assistant: The Heart of Your Smart Home
Home Assistant is a renowned open-source home automation platform that puts the control of all your smart devices into one user-friendly interface. From managing lights to controlling security systems, Home Assistant does it all, including integration with OpenEVSE chargers.
The Perfect Pair: OpenEVSE and Home Assistant
Combining OpenEVSE with Home Assistant creates a powerhouse duo. By linking your EV charger with your home automation system, you can optimise charging times to utilise surplus solar power. This not only reduces your carbon footprint but also your electricity bills.
How Does it Work?
- Solar Power Integration: With Home Assistant, you can monitor your home’s solar power generation in real-time.
- Smart Charging Decisions: The system can be programmed to initiate charging when your solar panels are producing excess power. This ensures your EV is charged using the cleanest energy possible.
- Customisable Controls: Set preferences for charging times, minimum charge levels, and more. Whether you want to ensure your car is ready for the morning commute or prefer charging only when solar output is at its peak, the choice is yours.
- Monitoring and Reporting: Keep tabs on your charging patterns, energy usage, and savings, all through the Home Assistant dashboard.
The Benefits
- Eco-Friendly: Maximises the use of renewable energy.
- Cost-Effective: Utilises surplus solar power, reducing reliance on the grid.
- Convenience and Control: Manage and monitor your EV charging remotely.
Getting Started
Setting up this integration involves some technical know-how but is a rewarding project for those who enjoy home automation and technical pursuits. You’ll need an OpenEVSE charger, a Home Assistant setup, and possibly additional sensors or smart devices depending on your existing home solar setup.
Hardware & Software Requirements
The procedures outlined in this guide have been verified using specific hardware and a single Fronius inverter. If your setup includes multiple inverters, it’s essential to configure them in a master/follower arrangement to guarantee effective energy curtailment.
Core Hardware
-
- Raspberry Pi, PC, or Server running Home Assistant: To host your Home Assistant instance.
- Wi-Fi Router or Ethernet Switch: To ensure all your devices are connected and can communicate with each other.
Energy Components
-
- Inverter & Smart Meter: For real-time energy measurement and communication with the inverter.
Software
- Home Assistant Software: Either the Home Assistant OS, Home Assistant Container, or Home Assistant Supervised, based on your preference and hardware.
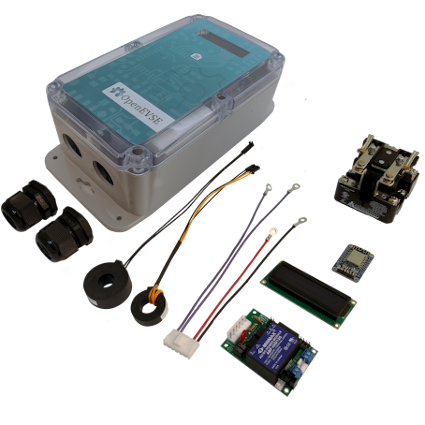
- OpenEVSE kit: OpenEVSE kits are ideal for those keen to learn about their EV charging station. Easily assembled in about an hour with just a couple of screwdrivers, these kits make understanding and building your charger straightforward and rewarding.
Step 1: Install the OpenEVSE charger
Start by assembling the OpenEVSE charger according to the included instructions. This process is designed to be simple and user-friendly. Once you have assembled the charger, it’s essential to have a qualified electrician handle the installation. This ensures that your charger is installed safely and in compliance with all necessary electrical codes and standards. Following the installation, the next crucial step is connecting the charger to your home’s Wi-Fi network. This will enable you to access the charger’s dedicated webpage through its unique IP address, allowing for easy monitoring and control of your charging settings.

Step 2: Install Mosquitto MQTT
For effective communication between your home automation devices, Mosquitto MQTT is essential. It’s a lightweight messaging protocol ideal for connecting various devices with minimal network load. While the installation of Mosquitto MQTT is crucial, it’s quite technical, so we won’t cover it in detail here. For guidance, check out these resources:
- Official Documentation: Mosquitto.org
- Beginner’s Guide: HiveMQ’s MQTT Essentials
- Video Tutorials: Search “Mosquitto MQTT Installation Guide” on YouTube
- Community Help: Visit forums like r/homeautomation on Reddit or Home Assistant Community.
Step 3: Configuring MQTT in OpenEVSE
For this step, you’ll need to access the web browser interface that you set up in Step 1. Once there, navigate to the ‘Settings’ area. Here, you’ll find the options to configure the MQTT topics. Follow these guidelines to ensure proper configuration:
- Go to the ‘MQTT’ section within ‘Settings’.
- Enter the necessary details for your MQTT topics as per your requirements.
Remember, configuring MQTT correctly is key to ensuring smooth communication between your OpenEVSE charger and other devices in your home automation system.

Step 4: Get going with Home Assistant
Before diving in, have a look at my previous blog for some basics. It’ll make following this guide a breeze. Let’s get to it!
Step 5: Setting Up Input Booleans for Solar Charging
To facilitate solar charging, you’ll need to create an input boolean in Home Assistant. This serves as a switch to enable or disable solar charging as needed. Here’s how to do it:
- Access Home Assistant: Log in to your Home Assistant instance.
- Navigate to Helpers: Go to ‘Settings’, and then select ‘Helpers’.
- Create an Input Boolean: In the Helpers menu, create a new input_boolean. This will act as your control mechanism for initiating solar charging.

By setting up this input boolean, you’ll have a simple yet effective way to manage when your OpenEVSE charger utilises solar power, aligning your EV charging with optimal energy usage.
Step 6: Setting Up a Button Card for Solar Charging Activation
To streamline the activation of solar charging, setting up a button card in your Home Assistant dashboard is a practical solution. This button card will serve as a convenient control to toggle solar charging, ensuring that your EV charger consumes energy only when there is a surplus from your solar panels. Solar-Powered EV Charging with OpenEVSE and Home Assistant.
Implementation Steps
- Access the Dashboard: Open your Home Assistant dashboard where you want to add the button card.
- Create the Button Card: In the dashboard editing mode, add a new button card. This card will be specifically configured to control the solar charging feature.
- Configure the Card: Set up the card to interact with the previously created input boolean for solar charging. This will allow the card to act as an on/off switch for the charging process, depending on the availability of surplus solar power.
- Customize the Appearance: Personalize the button card with an intuitive name like ‘Activate Solar Charging’ and choose an icon that best represents solar energy or EV charging. This will make it visually clear and user-friendly.
By implementing this button card, you’ll have a handy and straightforward method to control when your OpenEVSE charger uses solar power, enhancing both the efficiency and convenience of your home EV charging setup.


Step 7: Creating Custom Sensors in Home Assistant
To add these sensors, you’ll need to modify your configuration.yaml file in Home Assistant. Insert the sensor configurations under the appropriate section, ensuring you align with the YAML formatting rules.
Total OpenEVSE Amps Available:
- Purpose: This sensor calculates the total available amperage for your OpenEVSE charger, factoring in the energy fed into the power grid and the current charging watts.
- Configuration:
- Name:
total_openevse_amps_available - Unit of Measurement: Amps (A)
- Value Template: Calculated based on the power fed into the grid, current charging watts, and voltage.
- Name:
total_openevse_amps_available:
  friendly_name: 'Total OpenEVSE Amps Available'
  unit_of_measurement: 'A'
  value_template: >-
    {{
      (((states("sensor.feed_into_power_grid") | float(0) +
      states("sensor.openevse_charging_watts") | float(0)) /
      (states("sensor.grid_voltage") | round(0, default=1)) + 3 | float(0))) |
      round(0, default=0)
    }}
  availability_template: >-
    {{
      states("sensor.openevse_charging_watts") not in ["unavailable", "unknown"] or
      states("sensor.grid_voltage") not in ["unavailable", "unknown"] or
      states("sensor.feed_into_power_grid") not in ["unavailable", "unknown"]
    }}
Feed into Power Grid:
- Purpose: Monitors the power being fed back into the grid from your solar setup.
- Configuration:
- Name:
feed_into_power_grid - Unit of Measurement: Watts (W)
- Value Template: Calculates the power based on the Fronius power flow sensor, with adjustments for sign and rounding.
- Name:
feed_into_power_grid:
  value_template: >-
    {{
      (states.sensor.power_grid_fronius_power_flow_0_http_fronius.state | round(0, default=0) | int(0) / -1)
    }}
  availability_template: >-
    {{
      states("sensor.power_grid_fronius_power_flow_0_http_fronius") not in ["unavailable", "unknown"]
    }}
  unit_of_measurement: 'W'
OpenEVSE Charging Watts:
- Purpose: Tracks the wattage your OpenEVSE charger is currently using.
- Configuration:
- Name:
openevse_charging_watts - Unit of Measurement: Watts (W)
- Value Template: Calculates based on the OpenEVSE charging amps, with a conversion factor.
- Name:
openevse_charging_watts:
  friendly_name: 'OpenEVSE Charging Watts'
  value_template: >-
    {{
      ((states("sensor.openevse_charging_amps") | float(0) | multiply(0.24)) | int)
    }}
  unit_of_measurement: 'W'
OpenEVSE Voltage Sensor:
- Purpose: To monitor the voltage of your OpenEVSE charger.
- Configuration:
- Name:
OpenEVSE Voltage - State Topic: MQTT topic for OpenEVSE voltage (e.g.,
openevse-9c0c/voltage) - Quality of Service (QoS): 1 (to ensure timely delivery of messages).
- Name:
sensor:
  - name: "OpenEVSE Voltage"
    state_topic: "openevse-9c0c/voltage"
    qos: 1
    unit_of_measurement: "V"
Step 8: Setting Up a REST Command for OpenEVSE Control
To harness the full potential of your OpenEVSE charger through Home Assistant, you’ll need to establish a REST command. This command enables API control over your charger, allowing you to make adjustments remotely via your Home Assistant setup. Note: IP address below is of the OpenEVSE device
rest_command:
  set_openevse_charging_current:
    url: 'http://192.168.x.x/claims/client/65537'
    method: POST
    payload: >-
      {
        "state": "active",
        "charge_current": {{ states("sensor.total_openevse_amps_available") }},
        "max_current": 40,
        "energy_limit": 0,
        "time_limit": 0,
        "auto_release": false
      }
    content_type: 'application/json'
Step 9: Implementing an Efficient Automation for OpenEVSE Charging
To fully utilize your OpenEVSE charger in conjunction with solar power, setting up a specific automation in Home Assistant can significantly enhance the effectiveness of your setup. This automation intelligently adjusts the charging process based on solar availability and other crucial factors. This automation is the heart of Solar-Powered EV Charging with OpenEVSE and Home Assistant since it consistently monitors solar availability and manages current.
alias: "ON: Variable OpenEVSE Current Peak Cost"
description: "ON: Set OpenEVSE charging current when solar mode is on and sun up"
trigger:
  - platform: state
    entity_id:
      - sensor.total_openevse_amps_available
    to: null
  - platform: homeassistant
    event: start
  - platform: state
    entity_id:
      - input_boolean.openevse_solar_charge
    from: "off"
    to: "on"
condition:
  - condition: state
    entity_id: input_boolean.openevse_solar_charge
    state: "on"
  - condition: or
    conditions:
      - condition: template
        value_template: >
          {{ trigger.to_state.state|float > trigger.from_state.state|float }}
      - condition: template
        value_template: >
          {{ trigger.to_state.state|float < trigger.from_state.state|float }}
    alias: Confirm there is a change in state
  - condition: state
    entity_id: sun.sun
    state: above_horizon
  - condition: not
    conditions:
      - condition: template
        value_template: >
          {{ as_timestamp(now()) - as_timestamp(state_attr('automation.on_variable_openevse_current_peak_cost', 'last_triggered')) > 10 }}
  - condition: not
    conditions:
      - condition: not
        conditions:
          - condition: state
            entity_id: sensor.openevse_state
            state: Not Connected
action:
  - service: rest_command.set_openevse_charging_current
    data: {}
mode: restart 

Great article! I appreciate the clear and insightful perspective you’ve shared. It’s fascinating to see how this topic is developing. For those interested in diving deeper, I found an excellent resource that expands on these ideas: check it out here. Looking forward to hearing others’ thoughts and continuing the discussion!